Categories
How to... Web Design

HTTPS by default

When you enter information into an online form, do you check for a padlock in your address bar? Would you have done the same 3 years ago? If there’s no padlock in your browser address bar, that means your data isn’t being transferred securely (in fact even if there is a padlock, it might still not be transferred securely… but that’s a different story). This means that anyone on the route between your computer and the machine hosting the website you’re sending data to could see said data.
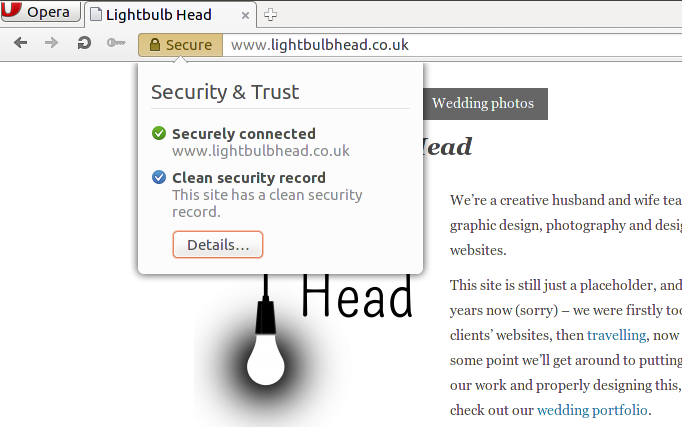
OperaSSL

In the post-Snowden world that we live in, I think it’s fair to say that people in general are more aware of the information that they’re sharing online. But as a website visitor, you have very little choice as to whether your favourite website offers a secure version or not, which is why, I guess, Google have started to use the presence of a secure version of a website in their rankings – to encourage web developers to give their visitors a secure browsing experience. Obviously banks provide a secure version by default, as do most social networks and shopping sites, but small businesses may not and I think this is the group that Google are trying to appeal to with this move.

Excitingly, the move has coincided with Let’s Encrypt (an American charity working to “reduce financial, technological, and education barriers to secure communication over the Internet”) moving to public beta, and they’re offering free HTTPS certificates, which allow you to create a secure version of your site. As our hosting company, Dreamhost, have partnered with Let’s Encrypt there was no reason for us not to transition this site (plus our personal site and church site) across to secure versions, and it was much easier than I thought it would be for each domain:

  1. Register for the free certificate through Let’s Encrypt and install the certificate on the site
    Dreamhost made this easy for me and it was a one-click action for each site
  2. Check that visiting https://<domain name> works
    At this stage on each site, I got a padlock in the address bar, but with validation errors, as not all of the links within the site were referencing the secure version – only those which were relative links
  3. Fix all of the links
    Now this was the fun part – trying to fix all of the links. As all of the sites are WordPress sites, I went through the following stages:

    • Set the WordPress URL and Site URL in the admin panel to be https://<domain name>
    • Go through my theme files and replace full URLs with relative URLs (embarrassingly I found quite a few, which were very sloppy of me – the newer bits of the sites were better though, using “bloginfo(‘stylesheet_url’)” and “bloginfo(‘template_url’)” properly)
    • Fix links within content. Now I really didn’t want to add another WordPress plugin to each site to create redirects, which is why I was happy when I came across some handy information at CSS-tricks.com (step 6), which I nabbed and implemented. I was unhappy I hadn’t come across it sooner in the process!
  4. Set it so that visitors are directed to the HTTPS version of the site by default
    I added the following to the top of my .htaccess file for each site:


    RewriteEngine On
    RewriteCond %{HTTPS} !=on
    RewriteRule ^(.*)$ https://%{HTTP_HOST}%{REQUEST_URI} [L,R=301]

  5. Tell Google
    The final step was to add the HTTPS version of each site as a new “property” in the Google Webmaster Search Console

All in all, about half an hour per site, once I’d done a bit of faffing around.

Be safe online, kids.

Categories
Film How to... Photography

How to photograph your own wedding

It’s hard to break a habit of photographing weddings…even at your own wedding, so at our wedding last year (branded as KISTfest), we decided to set up a camera to take a picture every minute in the 2 days prior to the wedding and on the day itself. It’s not every groom that has to think about changing camera batteries, timelapse controller batteries and memory cards (we ended up filling four 4GB cards!) in the build-up to the wedding!

In order to get the best overall feel for the day, we needed the camera to be quite high up, so it was shot from a windowsill, overlooking the main marquee and the space in front; the hub of activity on the day. The windowsill position presented a few challenges with glare from the white frame, rain on the glass and then condensation on the morning of day 2. We also couldn’t go quite as wide as we wanted with the image, as the window frame would have featured. We think it was fairly successful though in capturing the the overall feel of the occasion though and we love freezing individual frames to see some of the great moments captured by the all-seeing eye.

As for camera settings…we didn’t do quite so well. It was one of the first time lapses we’d done and we foolishly decided to go for manual exposure so that you’d get a good feel for the changes in light. On the positive side, this decision gave us some lovely sunrise and sunset transitions of light, fading to and from black. But sadly it also led to some rather over-exposed shots of the marquee roof in bright sunlight and loss of detail at dusk. We’ve learned from that since though in our subsequent time lapses!

Kiri then created a soundscape to accompany the resulting time lapse, using mainly sound bytes from the day of the wedding, but a few off-the-shelf sounds to fill the gaps in the first two days.

Will we now be offering time lapse services as part of our wedding photography offerings? We’ll have to see when we get back from our travels!

Categories
How to... Photography

No business like snow business!

It’s snowing! Well…it was…but there’s not quite so much of it any more…I’m still hopeful that we’ll get some more though! Back in February 2009 I had my first ever “snow day” where I couldn’t get into work and I was forced to play in the snow in Sevenoaks and build this snowman (it’s a hard life!):

snowySevenoaks017

Since then I’ve had several opportunities to photograph snow and over that time I’ve learned that the following few tips that I wrote back in 2009 still stand when shooting the white stuff.

  • Exposure – It’s quite difficult to get photos of snow looking as white as it actually is. The automatic metering on a camera goes ‘oooh, I see lots of white, therefore I must be over-exposing this image’. So it’s necessary to compensate in the other direction. Open up the aperture by a fraction of an f-stop, or by 1 f-stop. Most digital cameras have an option to do this, and most of the photos I take in the snow average 1 f-spot of compensation.
  • Light – Light and shadow is even more important than with normal photography, as the range of colours is diminished (mainly white), so try to keep the composition interesting. A splash of colour in an otherwise white photo always works well.
  • Protection – Keep your camera protected! This is essential. It’s often been snowing pretty hard for some of the time I have been shooting snow, so I make sure that I am quick with shots, and between shots I keep the camera covered. I also allow a little time for the camera to get used to the colder temperature outside so that the lens won’t steam up. Also, protect your batteries – they don’t like the cold, so keep any spares very close to your body.

Since 2009 I’ve had several opportunities to see “proper snow”, with my favourite being a New Year trip to Riga in Latvia a couple of years ago. The depth of snow there could be measured in feet rather than inches, even though it was regularly carted away to places outside the city. Amongst several standard winter scenes that I photographed, my favourite from the trip has to be this one, taken from the Sky bar in Riga.

rigaNYE2010081

In the next few days Kiri and I intend to actually start using our Flickr account (flickr.com/lightbulbheaduk) and we’ll upload some of our snow pictures from previous years.

For now, we’ll sit in the warmth, charge up the camera batteries and hope to get some good photos of the snow tomorrow when there’s a fresh new blanket. Love it!